
The Art of Process Mapping (Part 2)
In Part 1 of this blog series, I discussed how useful process maps have been for me over the course of my career. I also provided a brief explanation and showed examples of different types of charts. You can access Part 1 of this blog from the link here. Some of the process maps discussed are commonly used by LSS practitioners, such as SIPOC, Swim Lane Map, and Value Stream Map. Others are rarely used on LSS projects, such as Customer Journey Map, IDEF0 Models and UML Diagrams.
In Part 2 of this series, I will discuss best practices in creating a process map, including facilitation techniques. I will also mention how to maximize the use of process maps. Finally, I will share some new ways I am experimenting with maps to solve problems or answer questions.
Facilitating a Mapping Session:
Mapping should always be a team activity. While I have done mapping with both teams and individuals, you definitely get the most value when done in a team setting. The more the team is engaged, the better the end-result will be. However, there are some pre and post work to consider when doing a mapping exercise. Here are some facilitation tips from my experience…
Pre-Mapping Activities
- Clearly communicate the goal of the mapping exercise – Common goals could be establishing a current state of a process in preparation of performing improvement activity, documenting an existing process to establish THE current known standard, communicating a process overview to stakeholders, or understanding a customer’s experience. Depending on the goal of your mapping exercise, pick the appropriate mapping technique.
- Pre-plan any Data Collection efforts – Depending on the type of mapping and the goal, there might be a need for information gathering that might enhance the development of the map. This is particularly true in case of a Value Stream Map. Otherwise, you will be guessing things like ‘What percent of the time does a mistake occur at this step in the process?’, ‘How long does this task take?’. You should spend time pre-arranging this effort prior to the mapping session.
- Ensure you have the right mix of team members – Participants in the mapping session should include a combination of front-line supervisors, staff who perform the tasks, individuals upstream and downstream (if possible), and a member or two who are completely away from the process and can bring a fresh set of eyes. One caveat: If you feel any potential team member would make others feel uncomfortable about sharing their knowledge or experience then those individuals should be excluded. Remember that one common goal is to capture the process as it currently operates – warts and all.
- Perform a Gemba walk prior to the mapping session – Walking through the actual process as it is operating normally gives the opportunity for the team to notice how things are actually done vs. the perception of how it is done. In instances where a Gemba walk might not be practical, I have used methods such as videotaping the process prior to the event, or asking the staff to re-simulate the activity using actual documents.
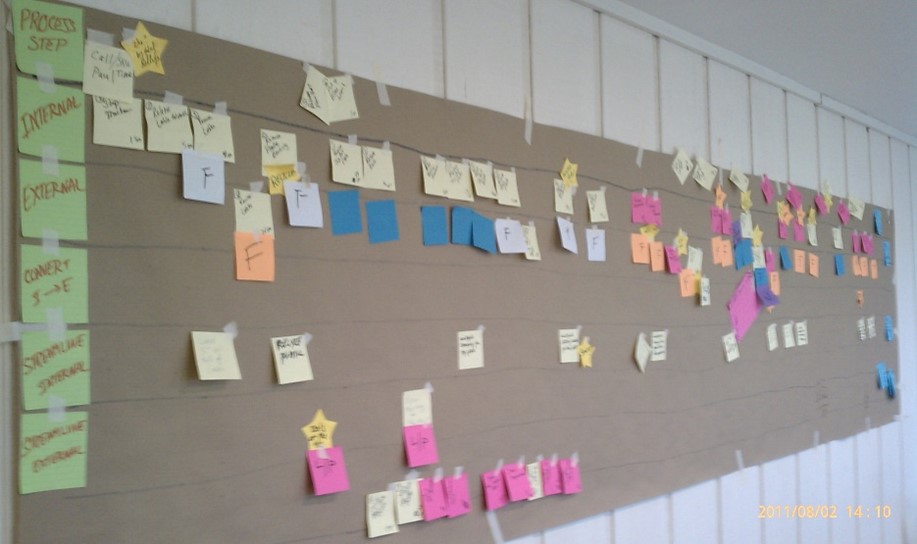
- Get Materials for Mapping – The best tools to facilitate a mapping session are white board/brown paper, sticky notes and markers. Some people refer to ‘butcher paper’. TMAC has actually purchased long rolls of such paper. We just cut off enough for a mapping session as part of our prep. In a pinch, you can take sheets of paper from an easel pad and tape them together. Writing the process steps on sticky notes not only engages the team but also allows to move things around as it is very common for team members to bring up process details out of sequence as they remember them.
During the Mapping Session
- Use Questions – In terms of facilitation, always ask leading questions such as, what is the next step in the process, is this the right sequence, what information is captured at this step…etc. Depending on the type of map, you might be capturing different types of information (Process Data, Customer Perception, Documents used, Systems involved).
- Identify Data Points – If you were unable to complete Data Collection as part of the pre-mapping activities then this must be done during mapping. As questions about each step naturally occurs (e.g., How long does this activity take? What percent of transactions goes down one path or another?) capture these questions for later research.
- Capture Exceptions – All processes have exceptions. It is natural that team members will bring up scenarios where the process deviates from normal. Can you really capture 100% of all deviations? My rule of thumb is to capture what happens in the process in a normal day (90 to 95% of the time). If there is a true process deviation due to certain conditions and it happens often enough, then use a decision box to split and capture both scenarios.
- Capture Improvement Ideas – As you are discovering the process, there is a natural tendency to improve the process. I recommend capturing the entire process prior to jumping to improvements. This provides the team an understanding of the entire process. As improvement ideas occur the best practice is to write these down on a ‘Parking Lot’ (i.e., a white board or easel pad). That way everyone can see them. Be sure to capture all ideas. You can review the ideas later in terms of feasibility, effectiveness, etc.
- Use of a Second Facilitator – Most of the time I’ve done mapping solo. And that works fine. But if you have a larger, more complex process then a second facilitator can be very useful. Some of the things this person can do: keep notes, ask questions, capture the map electronically, take photos, document issues, serve as a sounding board, etc.
- Assign Action Items – At the end of the mapping session be sure to assign participants any action items and agree on a date to gather again. For example, if there is a question about how often a certain type of customer places an order then someone in Sales may be tasked with answering this question. Or typing the list of improvement ideas may be assigned to someone else.
Post-Mapping Activities
- Use the Map for Follow-up Learning – After the mapping session is done, consider leaving the Map on the wall in an area visible to the process employees for a couple of days. This will give them an opportunity to review and communicate any information to the team. Another alternate is, to capture the process electronically and communicate to all stakeholders asking for its validation.
- Meet with the Mapping Team for a Review – After a few days or week, get together with the team to review the map and update it with any new information. You can also share any Next Steps on how the map will be used from a business standpoint.
Mix and Match Features:
Many times, I like to mix and match techniques from different types of maps. For example, in our LSS classes, when we teach mapping techniques we traditionally have the students go through an activity to create a Swim Lane map. As part of the Swim Lane, we show students how to incorporate elements of Value Stream Maps, such as Value-Add vs Non Value-Add steps, Process data (cycle time, WIP), and Takt Time calculations.
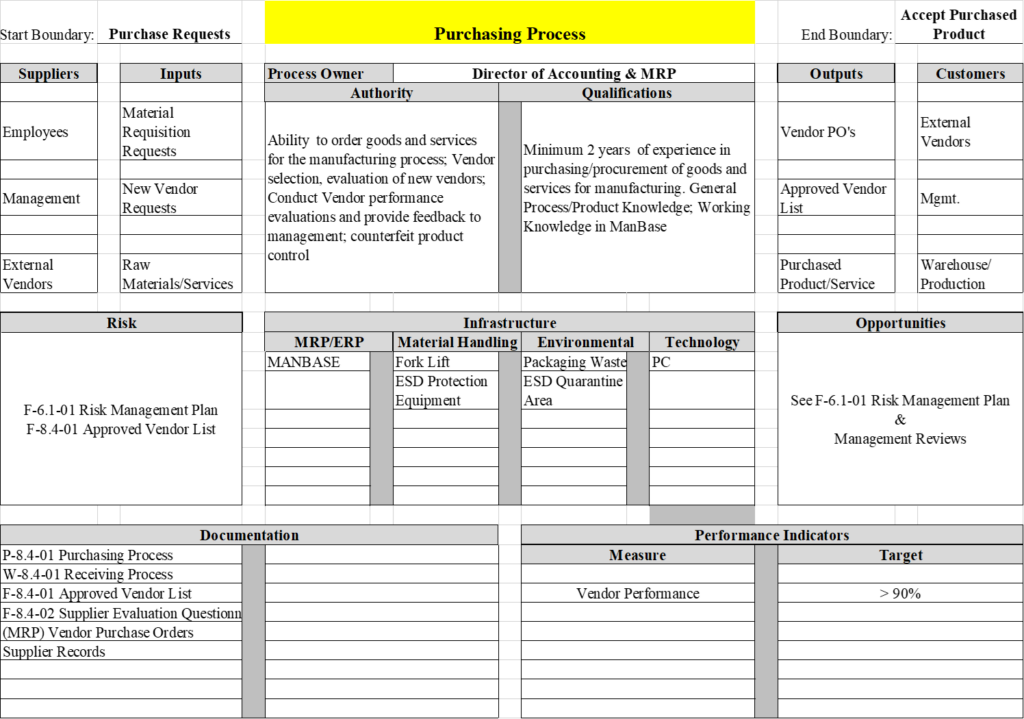
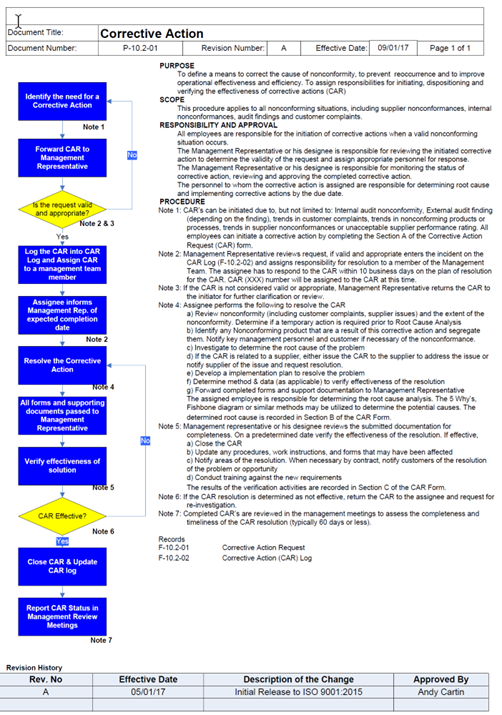
In other situations, I combined flowcharts with traditional standard operating procedures to enhance the documentation of a process. I also used flow charting techniques with TWI Job Instruction methods. I have also successfully adopted SIPOC Maps as a process communication tool. We adopted this approach into our Quality Management System Implementations where for each key process identified, we identify the Suppliers-Input-Process-Outputs-Customers for the process and add in the ISO elements such as Risk management, Quality Objectives, Process Documentation…etc. This technique not only helped us internally within an organization to provide a quick overview of each process to all employees, particularly new staff, but also assisted with improving the provision of information during audits.
This makes it very easy for the Process Owner during an audit. She just hands the Auditor the Process Map and all the information he needs from an audit perspective is right on the Map. (See below for an example).
Mapping for the Digital Transformation Age:
Lately, I am experimenting with the use of process mapping techniques in two new categories, both in the context of enabling digital transformation of an organization. One such scenario is to add a technology layer to traditional mapping techniques to facilitate the discussion of technological gaps with key stakeholders and how to strategically modernize the process. Can Mapping be used to understand the Digital requirements of a Process, in terms of both IT and OT Technology? Can Mapping be used as a tool to validate a requirements document of a new technology your organization is planning to implement?
Another such idea is the use of mapping methods to understand data streams (typically many at each process) and understand how integrated and seamless they are or can be. The idea here is to have an intelligent conversation with senior leadership on how the organization is collecting, utilizing, and maximizing the use of its data.
Have you thought of what the PLT in your organization is for converting Data to Insight? I don’t think this is currently measured in any organization. For these new concepts, I don’t have formal names, but I am loosely calling them Technology Mapping and Data Stream Mapping. I don’t have examples to share at this time, but I plan to test these techniques at my next mapping opportunity.
In conclusion, Process Mapping is one of my favorite go-to tools. Based on my vast use of these techniques over the past 20 years, here are some recommendations.
- Pick the right mapping technique for the application. When in doubt, a simple flow chart or a swim lane is a good starting point.
- Mapping exercises are best done as a team activity. Doing it alone means we could be missing vital information and process details.
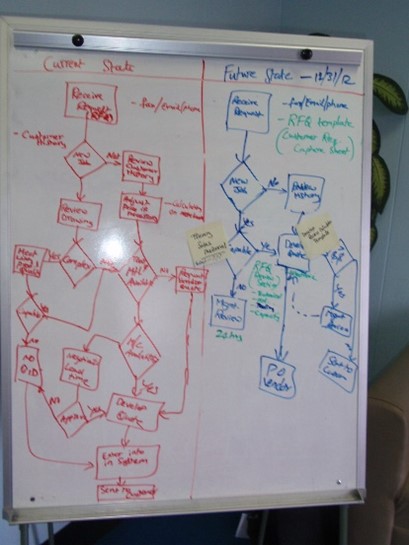
- When possible, always facilitate the session with a hands-on approach. Whiteboarding, Post-it notes or brown paper on the wall are the way to go. It is not only visual, but also encourages participants to engage and fosters a team culture.
- Lastly, if a decision is made to document the map electronically be sure to use an appropriate electronic method. Options include Word, PowerPoint, Visio, and others. (Yes, PowerPoint can be used as a Standard Operating Procedure)
- Don’t be afraid to mix and match concepts. Remember, the purpose of process mapping is to facilitate improvement. Experiment and learn from your mistakes.
Do you have other inventive ways of using process maps? Have you got any tips to share? I would love to hear from you and am always interested in learning new tricks on an old tool.
